补充:问题:CORS ,前后端访问跨域问题
我这边的解决方法是:
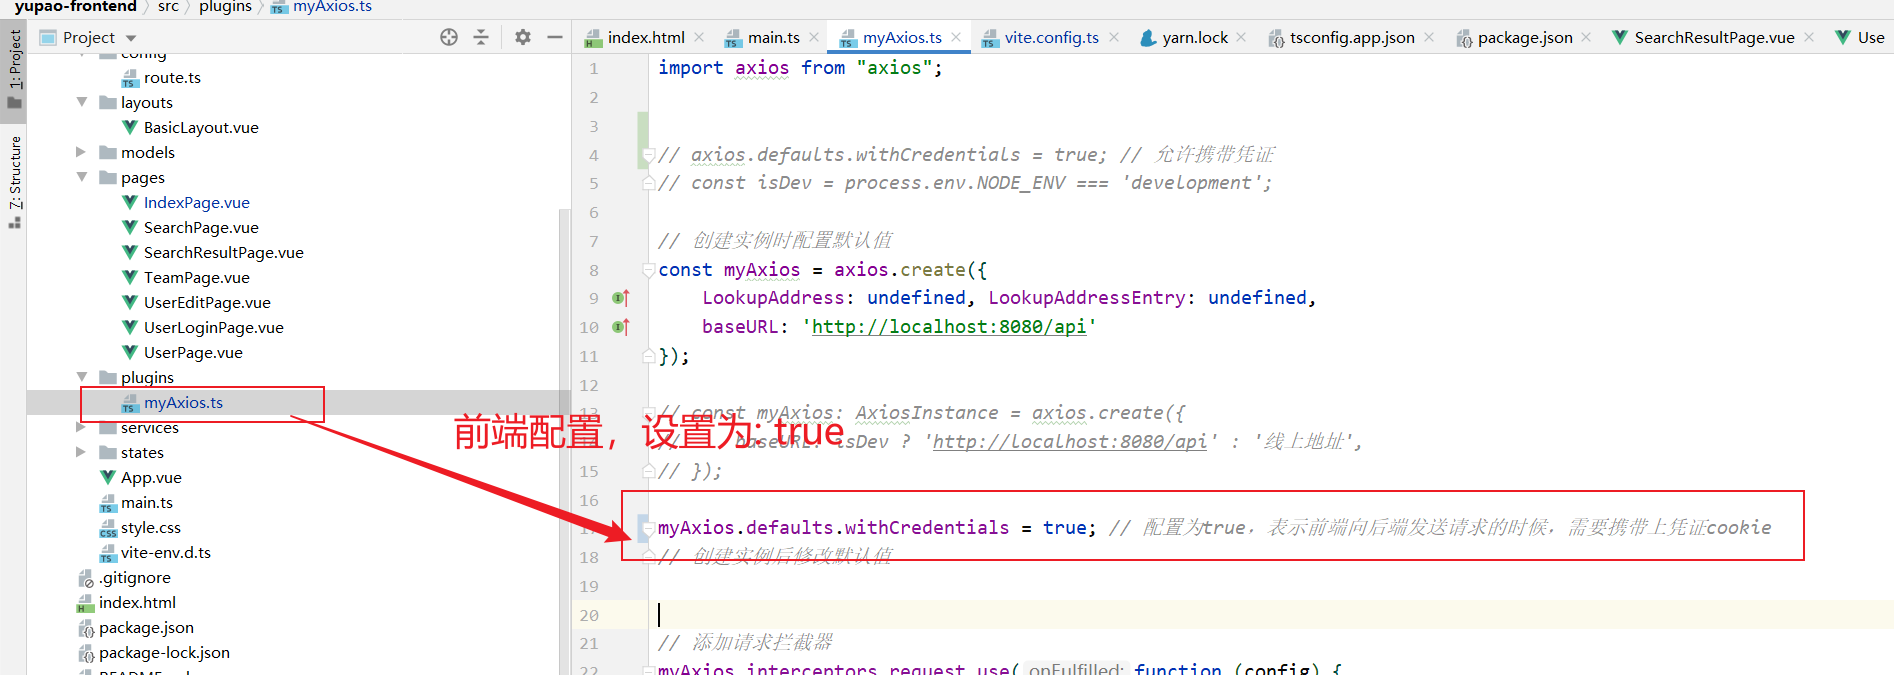
myAxios.defaults.withCredentials = true; // 配置为true,表示前端向后端发送请求的时候,需要携带上凭证cookie
整体的:
import axios from "axios";


// axios.defaults.withCredentials = true; // 允许携带凭证
// const isDev = process.env.NODE_ENV === 'development';

// 创建实例时配置默认值
const myAxios = axios.create({
    LookupAddress: undefined, LookupAddressEntry: undefined,
    baseURL: 'http://localhost:8080/api'
});

// const myAxios: AxiosInstance = axios.create({
//     baseURL: isDev ? 'http://localhost:8080/api' : '线上地址',
// });

myAxios.defaults.withCredentials = true; // 配置为true,表示前端向后端发送请求的时候,需要携带上凭证cookie
// 创建实例后修改默认值


// 添加请求拦截器
myAxios.interceptors.request.use(function (config) {
    // 在发送请求之前做些什么
    console.log('我要发请求了')
    return config;
}, function (error) {
    // 对请求错误做些什么
    return Promise.reject(error);
});

// 添加响应拦截器
myAxios.interceptors.response.use(function (response) {
    // 2xx 范围内的状态码都会触发该函数。
    // 对响应数据做点什么
    console.log('我收到你的响应了',response)
    return response.data;
}, function (error) {
    // 超出 2xx 范围的状态码都会触发该函数。
    // 对响应错误做点什么
    return Promise.reject(error);
});

// Add a request interceptor
// myAxios.interceptors.request.use(function (config) {
//     console.log('我要发请求啦', config)
//     // Do something before request is sent
//     return config;
// }, function (error) {
//     // Do something with request error
//     return Promise.reject(error);
// });
//
//
// // Add a response interceptor
// myAxios.interceptors.response.use(function (response) {
//     console.log('我收到你的响应啦', response)
//     // 未登录则跳转到登录页
//     if (response?.data?.code === 40100) {
//         const redirectUrl = window.location.href;
//         window.location.href = `/user/login?redirect=${redirectUrl}`;
//     }
//     // Do something with response data
//     return response.data;
// }, function (error) {
//     // Do something with response error
//     return Promise.reject(error);
// });

export default myAxios;
后端配置:
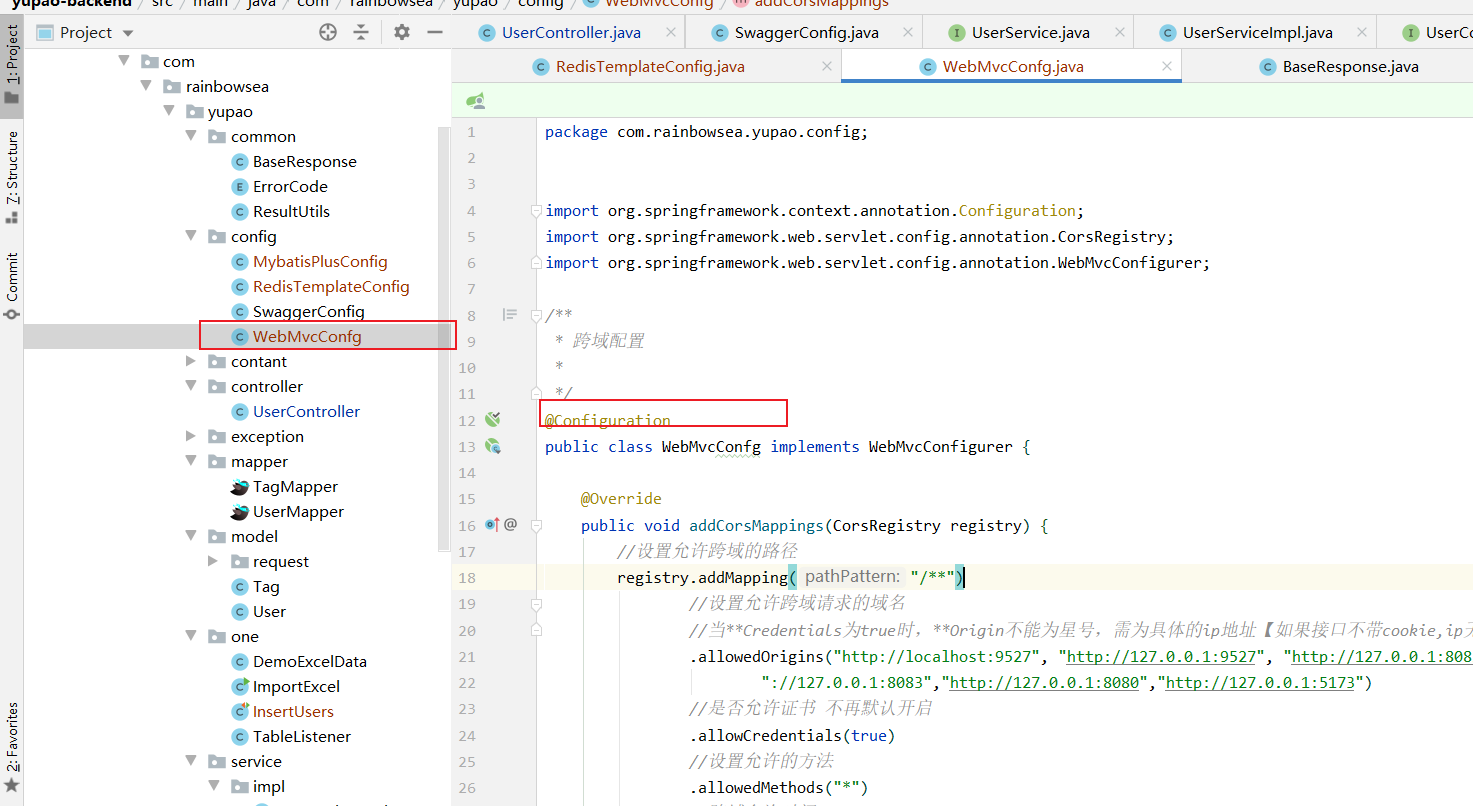
在 Spring Boot 中,可以通过在配置类中添加 <font style=”color:rgb(199, 37, 78);background-color:rgb(249, 242, 244);”>@CrossOrigin</font> 注解或实现 <font style=”color:rgb(199, 37, 78);background-color:rgb(249, 242, 244);”>WebMvcConfigurer</font> 接口并重写 <font style=”color:rgb(199, 37, 78);background-color:rgb(249, 242, 244);”>addCorsMappings</font> 方法来允许特定来源的跨域请求:
package com.rainbowsea.yupao.config;


import org.springframework.context.annotation.Configuration;
import org.springframework.web.servlet.config.annotation.CorsRegistry;
import org.springframework.web.servlet.config.annotation.WebMvcConfigurer;

/**
 * 跨域配置
 *
 */
@Configuration
public class WebMvcConfg implements WebMvcConfigurer {

    @Override
    public void addCorsMappings(CorsRegistry registry) {
        //设置允许跨域的路径
        registry.addMapping("/**")
                //设置允许跨域请求的域名
                //当**Credentials为true时,**Origin不能为星号,需为具体的ip地址【如果接口不带cookie,ip无需设成具体ip】
                .allowedOrigins("http://localhost:9527", "http://127.0.0.1:9527", "http://127.0.0.1:8082", "http" +
                        "://127.0.0.1:8083","http://127.0.0.1:8080","http://127.0.0.1:5173")
                //是否允许证书 不再默认开启
                .allowCredentials(true)
                //设置允许的方法
                .allowedMethods("*")
                //跨域允许时间
                .maxAge(3600);
    }
}
相关博客链接:
- https://blog.csdn.net/yuanlong12178/article/details/147143201 参考该 blog 解决的
- https://blog.csdn.net/xhmico/article/details/122338365 这篇也不错。
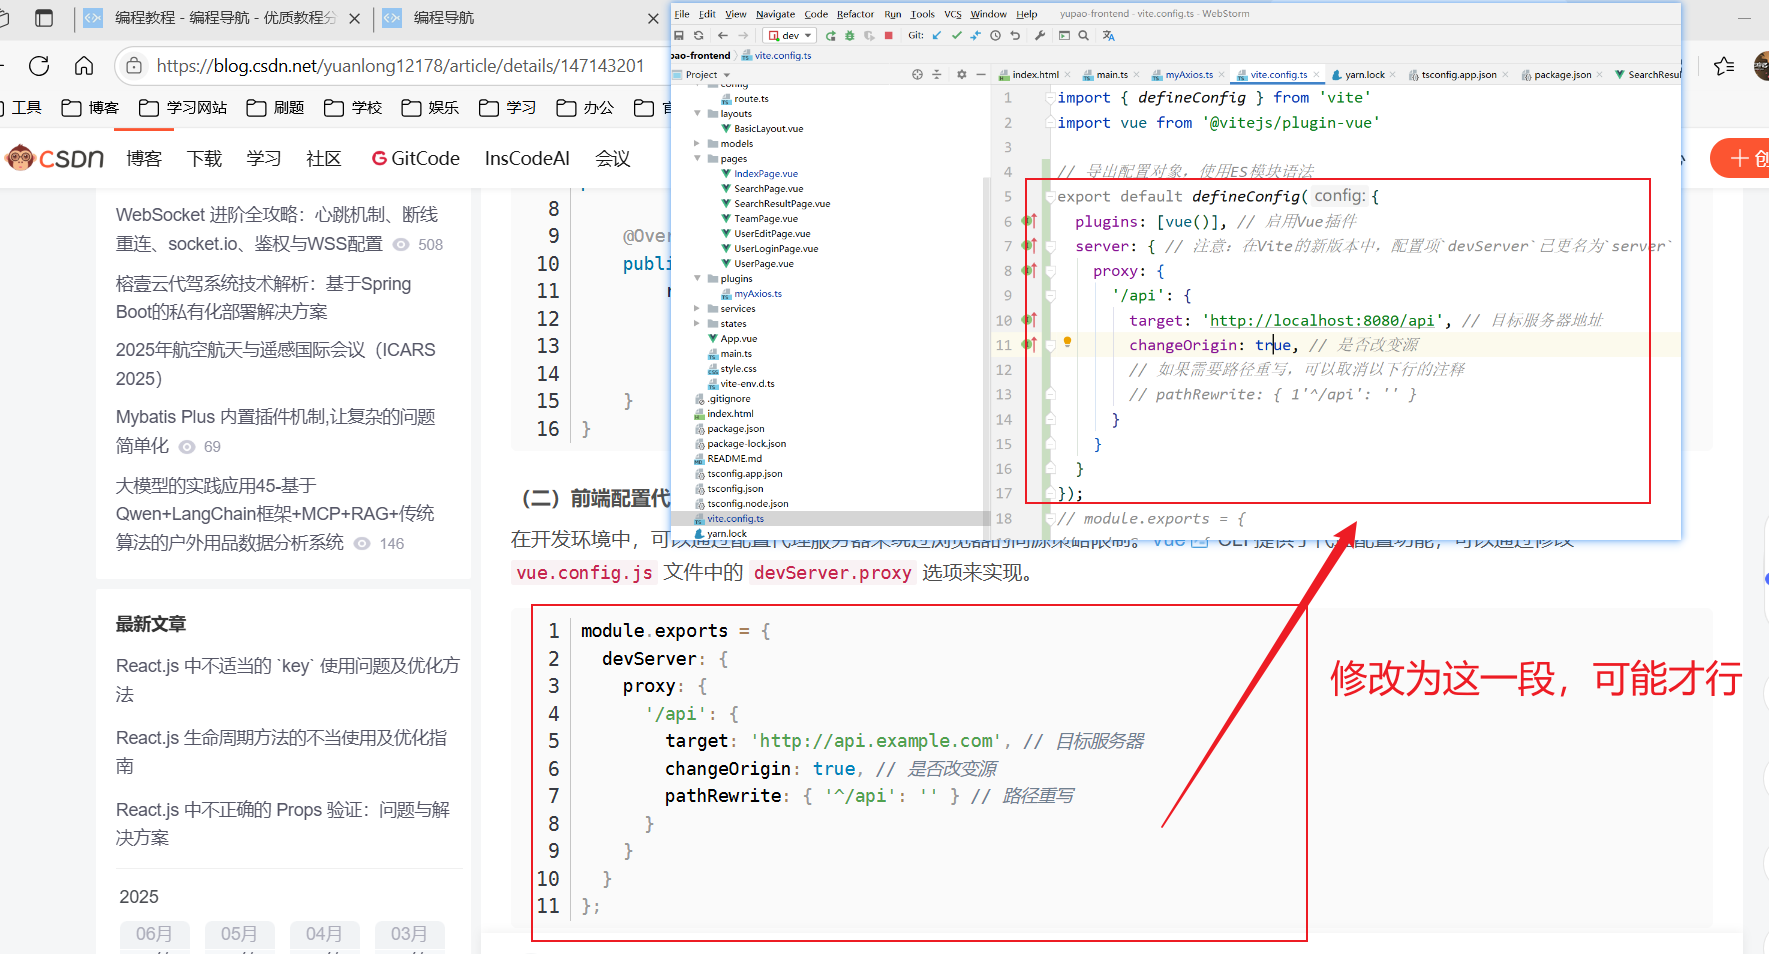
import { defineConfig } from 'vite'
import vue from '@vitejs/plugin-vue'

// 导出配置对象,使用ES模块语法
export default defineConfig({
  plugins: [vue()], // 启用Vue插件
  server: { // 注意:在Vite的新版本中,配置项`devServer`已更名为`server`
    proxy: {
      '/api': {
        target: 'http://localhost:8080/api', // 目标服务器地址
        changeOrigin: true, // 是否改变源
        // 如果需要路径重写,可以取消以下行的注释
        // pathRewrite: { 1'^/api': '' }
      }
    }
  }
});
https://blog.csdn.net/yuanlong12178/article/details/147143201 内容备份如下:
一、Vue.js 中跨域请求未配置 CORS 的常见原因
(一)浏览器的同源策略限制
浏览器的同源策略限制了从一个源加载的文档或脚本与来自另一个源的资源之间的交互能力。当你的前端应用和后端 API 位于不同的域或端口时,就会触发 CORS 问题。
(二)后端未正确配置 CORS
如果后端服务器未正确设置 CORS 相关的响应头,浏览器将无法允许跨域请求。
二、解决方案
(一)后端配置 CORS
在后端服务器上进行 CORS 配置是解决跨域问题的根本方法。以下是一些常见后端框架的 CORS 配置示例:
- Node.js (使用 Express)
const express = require('express');
const cors = require('cors');
const app = express();

app.use(cors({
  origin: 'http://localhost:8080', // 允许的源
  methods: ['GET', 'POST', 'PUT', 'DELETE'], // 允许的 HTTP 方法
  allowedHeaders: ['Content-Type', 'Authorization'] // 允许的头部字段
}));

app.get('/api/data', (req, res) => {
  res.json({ message: 'CORS is working!' });
});

app.listen(3000, () => {
  console.log('Server is running on port 3000');
});
2. Spring Boot
在 Spring Boot 中,可以通过在配置类中添加 <font style=”color:rgb(199, 37, 78);background-color:rgb(249, 242, 244);”>@CrossOrigin</font> 注解或实现 <font style=”color:rgb(199, 37, 78);background-color:rgb(249, 242, 244);”>WebMvcConfigurer</font> 接口并重写 <font style=”color:rgb(199, 37, 78);background-color:rgb(249, 242, 244);”>addCorsMappings</font> 方法来允许特定来源的跨域请求:
import org.springframework.context.annotation.Bean;
import org.springframework.context.annotation.Configuration;
import org.springframework.web.servlet.config.annotation.CorsRegistry;
import org.springframework.web.servlet.config.annotation.WebMvcConfigurer;

@Configuration
public class WebConfig implements WebMvcConfigurer {

    @Override
    public void addCorsMappings(CorsRegistry registry) {
        registry.addMapping("/api/**")
                .allowedOrigins("http://localhost:8080")
                .allowedMethods("GET", "POST", "PUT", "DELETE")
                .allowCredentials(true);
    }
}
(二)前端配置代理
在开发环境中,可以通过配置代理服务器来绕过浏览器的同源策略限制。Vue CLI 提供了代理配置功能,可以通过修改 <font style=”color:rgb(199, 37, 78);background-color:rgb(249, 242, 244);”>vue.config.js</font> 文件中的 <font style=”color:rgb(199, 37, 78);background-color:rgb(249, 242, 244);”>devServer.proxy</font> 选项来实现。
module.exports = {
  devServer: {
    proxy: {
      '/api': {
        target: 'http://api.example.com', // 目标服务器
        changeOrigin: true, // 是否改变源
        pathRewrite: { '^/api': '' } // 路径重写
      }
    }
  }
};
(三)使用第三方库
使用像 <font style=”color:rgb(199, 37, 78);background-color:rgb(249, 242, 244);”>cors</font> 这样的第三方库可以大大简化 CORS 的配置过程。安装库后,可以在后端应用中引入并配置它:
const cors = require('cors');
const express = require('express');

const app = express();

app.use(cors({
  origin: 'http://localhost:8080',
  methods: 'GET,POST,PUT,DELETE',
  allowedHeaders: 'Content-Type,Authorization'
}));

// Rest of the server setup
(四)JSONP(不推荐)
JSONP 是一种较老的跨域解决方案,通过 <font style=”color:rgb(199, 37, 78);background-color:rgb(249, 242, 244);”><script></font> 标签的跨域加载机制来实现。它只支持 GET 请求,且存在安全风险,因此在现代应用中不推荐使用。
三、最佳实践建议
(一)优先在后端配置 CORS
在生产环境中,优先在后端服务器上进行 CORS 配置,以确保安全性。
(二)开发环境使用代理
在开发环境中,使用 Vue CLI 的代理功能来解决跨域问题,避免修改后端代码。
(三)避免使用 JSONP
由于 JSONP 存在安全风险且只支持 GET 请求,建议避免使用。
四、总结
在 Vue.js 中,解决跨域请求未配置 CORS 的问题可以通过后端配置 CORS、前端配置代理、使用第三方库等方法来实现。后端配置 CORS 是最推荐的方法,因为它可以确保生产环境的安全性。在开发环境中,使用 Vue CLI 的代理功能可以快速解决跨域问题。希望本文的介绍能帮助你在 Vue.js 开发中更好地处理跨域请求,提升应用的性能和用户体验。
最后:
“在这个最后的篇章中,我要表达我对每一位读者的感激之情。你们的关注和回复是我创作的动力源泉,我从你们身上吸取了无尽的灵感与勇气。我会将你们的鼓励留在心底,继续在其他的领域奋斗。感谢你们,我们总会在某个时刻再次相遇。”