
多线程
重点:
  1.会用wait和notify两个方法
  2.会使用Lock锁对象
  3.会利用Callable接口实现多线程
  4.会使用线程池完成多线程
第一章.等待唤醒机制
1.等待唤醒案例分析(线程之间的通信)
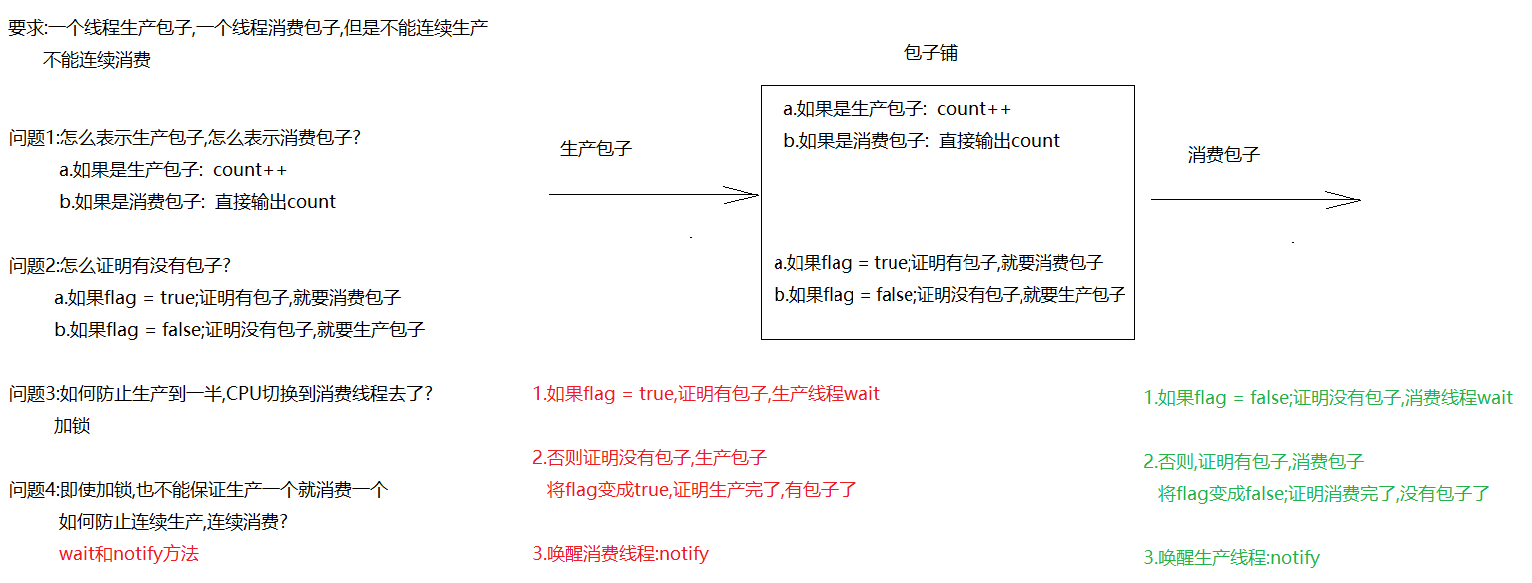
要求:一个线程生产,一个线程消费,不能连续生产,不能连续消费 -> 等待唤醒机制(生产者,消费者)(线程之间的通信)
| 方法 | 说明 |
|---|---|
| void wait() | 线程等待,等待的过程中线程会释放锁,需要被其他线程调用notify方法将其唤醒,重新抢锁执行,但是并不会重新执行全部代码 |
| void notify() | 线程唤醒,一次唤醒一个等待线程;如果有多条线程等待,则随机唤醒一条等待线程 |
| void notifyAll() | 唤醒所有等待线程 |
wait和notify方法需要锁对象调用,所以需要用到同步代码块中,而且必须是同一个锁对象


2.等待唤醒案例实现
/*
   count和flag可以定义成包装类
   但是要记得给count和flag手动赋值
   不然对于本案例来说,容易出现空指针异常
 */
public class BaoZiPu {
    //代表包子的count
    private int count;
    //代表是否有包子的flag
    private boolean flag;

    public BaoZiPu() {
    }

    public BaoZiPu(int count, boolean flag) {
        this.count = count;
        this.flag = flag;
    }

    /*
       getCount 改造成消费包子方法
       直接输出count
     */
    public void getCount() {
        System.out.println("消费了..............第"+count+"个包子");
    }

    /*
       setCount 改造成生产包子
       count++
     */
    public void setCount() {
        count++;
        System.out.println("生产了...第"+count+"个包子");
    }

    public boolean isFlag() {
        return flag;
    }

    public void setFlag(boolean flag) {
        this.flag = flag;
    }
}
public class Product implements Runnable{
    private BaoZiPu baoZiPu;

    public Product(BaoZiPu baoZiPu) {
        this.baoZiPu = baoZiPu;
    }

    @Override
    public void run() {
        while(true){

            try {
                Thread.sleep(100L);
            } catch (InterruptedException e) {
                throw new RuntimeException(e);
            }

            synchronized (baoZiPu){
                //1.判断flag是否为true,如果是true,证明有包子,生产线程等待
                if (baoZiPu.isFlag()==true){
                    try {
                        baoZiPu.wait();
                    } catch (InterruptedException e) {
                        throw new RuntimeException(e);
                    }
                }

                //2.如果flag为false,证明没有包子,开始生产
                baoZiPu.setCount();
                //3.改变flag状态,为true,证明生产完了,有包子了
                baoZiPu.setFlag(true);
                //4.唤醒消费线程
                baoZiPu.notify();
            }
        }
    }
}
public class Consumer implements Runnable{
    private BaoZiPu baoZiPu;

    public Consumer(BaoZiPu baoZiPu) {
        this.baoZiPu = baoZiPu;
    }

    @Override
    public void run() {
        while(true){

            try {
                Thread.sleep(100L);
            } catch (InterruptedException e) {
                throw new RuntimeException(e);
            }

            synchronized (baoZiPu){
                //1.判断flag是否为false,如果是false,证明没有包子,消费线程等待
                if (baoZiPu.isFlag()==false){
                    try {
                        baoZiPu.wait();
                    } catch (InterruptedException e) {
                        throw new RuntimeException(e);
                    }
                }

                //2.如果flag为true,证明有包子,开始消费
                baoZiPu.getCount();
                //3.改变flag状态,为false,证明消费完了,没 有包子了
                baoZiPu.setFlag(false);
                //4.唤醒生产线程
                baoZiPu.notify();
            }
        }
    }
}
public class Test01 {
    public static void main(String[] args) {
        BaoZiPu baoZiPu = new BaoZiPu();

        Product product = new Product(baoZiPu);
        Consumer consumer = new Consumer(baoZiPu);

        Thread t1 = new Thread(product);
        Thread t2 = new Thread(consumer);

        t1.start();
        t2.start();
    }
}
总结:在该实例中,我们要考虑的是同步和互斥的问题:我们要实现生产一个消费一个,并且仅仅只有一个生产者和消费者,这就要考虑到:两个线程访问同一个资源的问题,我们利用同步代码进行上锁处理;还需要考虑生产和消费者的顺序问题,我们使用wait和notify两个api进行实现。
我们利用同步代码在消费者和生产者中进行重写了run方法,我们利用对象实例进行作为mutex互斥锁,利用一个变量来判断是否已经生产还是消费,若判断成功,则放在该实例对象的等待队列中,否则进行操作,然后随机唤醒等待队列的进程。
3.用同步方法改造等待唤醒案例
/*
   count和flag可以定义成包装类
   但是要记得给count和flag手动赋值
   不然对于本案例来说,容易出现空指针异常
 */
public class BaoZiPu {
    //代表包子的count
    private int count;
    //代表是否有包子的flag
    private boolean flag;

    public BaoZiPu() {
    }

    public BaoZiPu(int count, boolean flag) {
        this.count = count;
        this.flag = flag;
    }

    /*
       getCount 改造成消费包子方法
       直接输出count
     */
    public synchronized void getCount() {
        //1.判断flag是否为false,如果是false,证明没有包子,消费线程等待
        if (this.flag == false) {
            try {
                this.wait();
            } catch (InterruptedException e) {
                throw new RuntimeException(e);
            }
        }

        //2.如果flag为true,证明有包子,开始消费
        System.out.println("消费了..............第" + count + "个包子");

        //3.改变flag状态,为false,证明消费完了,没 有包子了
        this.flag = false;
        //4.唤醒生产线程
        this.notify();
    }

    /*
       setCount 改造成生产包子
       count++
     */
    public synchronized void setCount() {
        //1.判断flag是否为true,如果是true,证明有包子,生产线程等待
        if (this.flag == true) {
            try {
                this.wait();
            } catch (InterruptedException e) {
                throw new RuntimeException(e);
            }
        }

        //2.如果flag为false,证明没有包子,开始生产
        count++;
        System.out.println("生产了...第" + count + "个包子");
        //3.改变flag状态,为true,证明生产完了,有包子了
        this.flag = true;
        //4.唤醒消费线程
        this.notify();
    }

    public boolean isFlag() {
        return flag;
    }

    public void setFlag(boolean flag) {
        this.flag = flag;
    }
}
public class Product implements Runnable{
    private BaoZiPu baoZiPu;

    public Product(BaoZiPu baoZiPu) {
        this.baoZiPu = baoZiPu;
    }

    @Override
    public void run() {
        while(true){

            try {
                Thread.sleep(100L);
            } catch (InterruptedException e) {
                throw new RuntimeException(e);
            }
            baoZiPu.setCount();
        }
    }
}
public class Consumer implements Runnable{
    private BaoZiPu baoZiPu;

    public Consumer(BaoZiPu baoZiPu) {
        this.baoZiPu = baoZiPu;
    }

    @Override
    public void run() {
        while(true){

            try {
                Thread.sleep(100L);
            } catch (InterruptedException e) {
                throw new RuntimeException(e);
            }

            baoZiPu.getCount();
        }
    }
}
public class Test01 {
    public static void main(String[] args) {
        BaoZiPu baoZiPu = new BaoZiPu();

        Product product = new Product(baoZiPu);
        Consumer consumer = new Consumer(baoZiPu);

        Thread t1 = new Thread(product);
        Thread t2 = new Thread(consumer);

        t1.start();
        t2.start();
    }
}
在上述代码中,我们把同步代码放到了BaoZiPu中进行了实现,这里由于使用了wait和notify进行实现,我们必须在加上关键字,如果不加synchronized,会报异常,因为是synchronized方法中调用进行识别多线程的,不加无法实现wait和notify的功能。
第二章.多等待多唤醒
1.解决多生产多消费问题(if改为while,将notify改为notifyAll)
public class Test01 {
    public static void main(String[] args) {
        BaoZiPu baoZiPu = new BaoZiPu();

        Product product = new Product(baoZiPu);
        Consumer consumer = new Consumer(baoZiPu);

        new Thread(product).start();
        new Thread(product).start();
        new Thread(product).start();

        new Thread(consumer).start();
        new Thread(consumer).start();
        new Thread(consumer).start();
    }
}
/*
   count和flag可以定义成包装类
   但是要记得给count和flag手动赋值
   不然对于本案例来说,容易出现空指针异常
 */
public class BaoZiPu {
    //代表包子的count
    private int count;
    //代表是否有包子的flag
    private boolean flag;

    public BaoZiPu() {
    }

    public BaoZiPu(int count, boolean flag) {
        this.count = count;
        this.flag = flag;
    }

    /*
       getCount 改造成消费包子方法
       直接输出count
     */
    public synchronized void getCount() {
        //1.判断flag是否为false,如果是false,证明没有包子,消费线程等待
        while (this.flag == false) {
            try {
                this.wait();
            } catch (InterruptedException e) {
                throw new RuntimeException(e);
            }
        }

        //2.如果flag为true,证明有包子,开始消费
        System.out.println("消费了..............第" + count + "个包子");

        //3.改变flag状态,为false,证明消费完了,没 有包子了
        this.flag = false;
        //4.唤醒所有等待线程
        this.notifyAll();
    }

    /*
       setCount 改造成生产包子
       count++
     */
    public synchronized void setCount() {
        //1.判断flag是否为true,如果是true,证明有包子,生产线程等待
        while (this.flag == true) {
            try {
                this.wait();
            } catch (InterruptedException e) {
                throw new RuntimeException(e);
            }
        }

        //2.如果flag为false,证明没有包子,开始生产
        count++;
        System.out.println("生产了...第" + count + "个包子");
        //3.改变flag状态,为true,证明生产完了,有包子了
        this.flag = true;
        //4.唤醒所有等待线程
        this.notifyAll();
    }

    public boolean isFlag() {
        return flag;
    }

    public void setFlag(boolean flag) {
        this.flag = flag;
    }
}
public class Product implements Runnable{
    private BaoZiPu baoZiPu;

    public Product(BaoZiPu baoZiPu) {
        this.baoZiPu = baoZiPu;
    }

    @Override
    public void run() {
        while(true){

            try {
                Thread.sleep(100L);
            } catch (InterruptedException e) {
                throw new RuntimeException(e);
            }
            baoZiPu.setCount();
        }
    }
}
public class Consumer implements Runnable{
    private BaoZiPu baoZiPu;

    public Consumer(BaoZiPu baoZiPu) {
        this.baoZiPu = baoZiPu;
    }

    @Override
    public void run() {
        while(true){

            try {
                Thread.sleep(100L);
            } catch (InterruptedException e) {
                throw new RuntimeException(e);
            }

            baoZiPu.getCount();
        }
    }
}
总结:
这是什么:这是一个多等待多执行的例子,
和第一个区别:区别在于等待队列里可以有消费者也可以生产者
解决方案:if->while,notify->notifyAll,原因:1、改if变while是为了唤醒后如果状态变了,在过一遍while可以跳出这个循环,2、为什么要notifyAll,这是因为notify是随机唤醒,万一唤醒导致多个生产者进行都在阻塞,就会死锁。3、这两个需要一起使用,才可以达到效果。
第三章.Lock锁
1.Lock对象的介绍和基本使用
1.概述:Lock是一个接口,需要使用它的实现类去实例化对象
2.实现类:ReentrantLock
3.方法:
  lock() 获取锁
  unlock() 释放锁
4.原理:原理有些复杂,类似于信号量,会进行计数进行实现,不在深入讨论。简单讲:每次 lock() 使 state 加 1,每次 unlock() 使 state 减 1。只有 state 归零时,才真正释放锁并唤醒后续线程。

如:
    发现 state == 0(空闲)。
    通过 CAS 将 state 从 0 改为 1。
    记录当前线程为锁的持有者。
    线程进入临界区执行 ticket 操作。
public class MyTicket implements Runnable {
    //定义100张票
    int ticket = 100;

    //创建Lock对象
    Lock lock = new ReentrantLock();

    @Override
    public void run() {
        while (true) {
            try {
                Thread.sleep(100L);

                //获取锁
                lock.lock();
                if (ticket > 0) {
                    System.out.println(Thread.currentThread().getName() + "买了第" + ticket + "张票");
                    ticket--;
                }
            } catch (InterruptedException e) {
                throw new RuntimeException(e);
            }finally {
                //释放锁
                lock.unlock();
            }

        }
    }
}
public class Test01 {
    public static void main(String[] args) {
        MyTicket myTicket = new MyTicket();

        Thread t1 = new Thread(myTicket, "赵四");
        Thread t2 = new Thread(myTicket, "刘能");
        Thread t3 = new Thread(myTicket, "广坤");

        t1.start();
        t2.start();
        t3.start();
    }
}
synchronized:不管是同步代码块还是同步方法,都需要在结束一对{}之后,释放锁对象
Lock:是通过两个方法控制需要被同步的代码,更灵活
第四章.Callable接口_实现多线程方式三
1.概述:Callable<V>是一个接口,类似于Runnable
2.方法:
  V call()  -> 设置线程任务的,类似于run方法
3.call方法和run方法的区别:
  a.相同点:都是设置线程任务的
  b.不同点:
    call方法有返回值,而且有异常可以throws
    run方法没有返回值,而且有异常不可以throws

4.<V>
  a.<V>叫做泛型
  b.泛型:用于指定我们操作什么类型的数据,<>中只能写引用数据类型,如果泛型不写,默认是Object类型数据
  c.实现Callable接口时,指定泛型是什么类型的,重写的call方法返回值就是什么类型的

5.获取call方法返回值: FutureTask<V>
  a. FutureTask<V> 实现了一个接口: Future <V>
  b. FutureTask<V>中有一个方法:
     V get() -> 获取call方法的返回值

6.问题:为什么一个简单的“带返回值的任务”要绕这么大一圈——先创建 Callable,再包成 FutureTask,然后才能交给 Thread 去跑?
核心原因是:Thread 类只认 Runnable,不认 Callable。
	Thread 的构造函数参数只能是 Runnable,而 Runnable.run() 没有返回值,也不能抛出受检异常。如果我们想让线程执行完返回一个	结果,就必须用一种“包装”手段,把 Callable 伪装成 Runnable,同时又能在未来某个时刻拿到结果。FutureTask 就是用来做这个包装的:
它实现了 RunnableFuture 接口,而 RunnableFuture 同时继承了 Runnable 和 Future。
所以 FutureTask 本身可以被当作 Runnable 传给 Thread(Thread 看到的是 run() 方法)。
同时它又提供了 Future 的方法(比如 get()),让调用方可以阻塞等待结果。
你可以把 FutureTask 理解成一座桥梁:一边连着 Callable(真正的任务逻辑),另一边既能为 Thread 提供 run() 入口,又能为调用方提供结果获取接口。
总结一下:Thread那边只认Runable,但是Runable没有返回值,所以设计了一个接口Future去得到返回值等方法
         Runable接口     					Future接口
         	|->       RunnableFuture 接口	 	<-|
         					|			 (call方法)
         			  实现类FutureTask	--------------- Callable
         					|(传入)
         				Thread中方法,因为此时FutureTask可以看成Ruable子类

	Callable 能放进 FutureTask,仅仅是因为 FutureTask 内部定义了一个 Callable 类型的字段,并在构造时把它存起来,没有任何魔法。FutureTask 再通过实现 Runnable,使得这个“装有 Callable 的任务”可以被 Thread 执行,并且执行时自动调用 call() 并保存结果。

但是,这种用法不多,多数用线程池完成
public class MyCallable implements Callable<String> {

    @Override
    public String call() throws Exception {
        return "涛哥和金莲...的故事";
    }
}
public class Test {
    public static void main(String[] args) throws ExecutionException, InterruptedException {
        MyCallable myCallable = new MyCallable();
        /*
           FutureTask(Callable<V> callable)
         */
        FutureTask<String> futureTask = new FutureTask<>(myCallable);

        //创建Thread对象-> Thread(Runnable target)
        Thread t1 = new Thread(futureTask);
        t1.start();

        //调用get方法获取call方法返回值
        System.out.println(futureTask.get());
    }
}
第五章.线程池_实现多线程方式四

1.问题:之前来一个线程任务,就需要创建一个线程对象去执行,用完还要销毁线程对象,如果线程任务多了,就需要频繁创建线程对象和销毁线程对象(核心问题),这样会耗费内存资源,所以我们就想线程对象能不能循环利用,用的时候直接拿线程对象,用完还回去
1.如何创建线程池对象:工具类-> Executors
2.获取线程池对象:Executors中的静态方法:
  static ExecutorService newFixedThreadPool(int nThreads)
  a.参数:指定线程池中最多创建的线程对象条数
  b.返回值ExecutorService 是线程池,用来管理线程对象

3.执行线程任务: ExecutorService中的方法
  Future<?> submit(Runnable task) 提交一个Runnable任务用于执行
  Future<T> submit(Callable<T> task) 提交一个Callable任务用于执行

4.submit方法的返回值:Future接口
  用于接收run方法或者call方法返回值的,但是run方法没有返回值,所以可以不用Future接收,执行call方法需要用Future接收

  Future中有一个方法:V get()  用于获取call方法返回值

5. ExecutorService中的方法:
   void shutdown()  启动有序关闭,其中先前提交的任务将被执行,但不会接受任何新任务

6. 实现细节

1.创建n个线程线程的线程池
ExecutorService executor = Executors.newSingleThreadExecutor(n);
newSingleThreadExecutor是一个静态方法,返回值是ExecutorService

2. 提交 Callable 任务
Future<String> future = executor.submit(new MyCallable());
submit 方法的内部(以 AbstractExecutorService 的默认实现为例)会做两件事:
① 将 Callable 包装成 FutureTask
protected <T> RunnableFuture<T> newTaskFor(Callable<T> callable) {
    return new FutureTask<T>(callable);
}
这一步和你之前手动写的 FutureTask<String> futureTask = new FutureTask<>(myCallable); 一模一样——它生成一个既实现了 Runnable(能被线程执行)又实现了 Future(能获取结果)的对象。

② 把 FutureTask 交给线程池执行
public Future<?> submit(Runnable task) {
    // 实际调用 execute 方法,参数是 Runnable
    execute(task);
    return future;
}
execute 是 ThreadPoolExecutor 的核心方法,它会:
如果工作线程还没创建,就创建一个新线程(或者复用已有的空闲线程)。
将 FutureTask(作为 Runnable)放入工作队列。
工作线程会从队列里不断取出任务,调用它的 run() 方法。
所以本质上,executor.submit 帮你完成了 “创建 FutureTask + 启动线程执行” 这两个步骤。

3. 获取结果(阻塞等待)
System.out.println(future.get());
此时 future 实际上就是那个被提交的 FutureTask 对象(只是用 Future 接口引用它)。
FutureTask.get() 的逻辑和你之前用的一样:
如果任务还没执行完(run() 还没把结果写进 outcome 字段),当前线程(这里是 main 线程)就会阻塞。
阻塞通常通过 LockSupport.park() 实现,并且会等待一个 signal 唤醒。
当工作线程执行完 FutureTask.run() 后:
调用 callable.call() 拿到返回值(或捕获异常)。
将结果(或异常)保存到 outcome 字段。
调用 finishCompletion() 方法,唤醒所有在 get() 上等待的线程。
被唤醒的 main 线程从 get() 返回,拿到结果并打印。
public class MyRunnable implements Runnable{
    @Override
    public void run() {
        System.out.println(Thread.currentThread().getName()+"...执行了");
    }
}
public class Test01 {
    public static void main(String[] args) {
        //创建线程池对象
        ExecutorService es = Executors.newFixedThreadPool(2);
        es.submit(new MyRunnable());
        es.submit(new MyRunnable());
        es.submit(new MyRunnable());

        //es.shutdown();//关闭线程池对象
    }
}
public class MyCallable implements Callable<Integer> {
    @Override
    public Integer call() throws Exception {
        return 1;
    }
}
public class Test02 {
    public static void main(String[] args) throws ExecutionException, InterruptedException {
        ExecutorService es = Executors.newFixedThreadPool(3);
        Future<Integer> f1 = es.submit(new MyCallable());
        Future<Integer> f2 = es.submit(new MyCallable());
        Future<Integer> f3 = es.submit(new MyCallable());
        Future<Integer> f4 = es.submit(new MyCallable());
        Future<Integer> f5 = es.submit(new MyCallable());
        System.out.println(f1.get());
        System.out.println(f2.get());
        System.out.println(f3.get());
        System.out.println(f4.get());
        System.out.println(f5.get());
    }
}

具体流程图如下:
sequenceDiagram participant Main as 主线程 participant Pool as 线程池<br/>(3个工作线程) participant Queue as 阻塞队列<br/>(无界) Main->>Pool: submit(任务1) → f1 Main->>Pool: submit(任务2) → f2 Main->>Pool: submit(任务3) → f3 Note over Pool: 3个空闲线程立刻分别执行任务1,2,3 Main->>Queue: submit(任务4) → f4 Main->>Queue: submit(任务5) → f5 Note over Queue: 任务4,5进入队列等待 Main->>Main: f1.get() 阻塞,等待任务1完成 par 任务1执行中 Pool->>Pool: 线程A 执行任务1 (耗时) and 任务2执行中 Pool->>Pool: 线程B 执行任务2 (耗时) and 任务3执行中 Pool->>Pool: 线程C 执行任务3 (耗时) end Note over Pool: 假设任务1最先完成 Pool–>>Main: 任务1完成,唤醒主线程 Main->>Main: f1.get() 返回,打印结果1 Main->>Main: f2.get() 阻塞,等待任务2完成 Note over Pool: 线程A空闲,立即从队列取任务4执行 Pool->>Pool: 线程A 执行任务4 Note over Pool: 任务2完成(可能已同时完成) Pool–>>Main: 任务2完成,唤醒主线程 Main->>Main: f2.get() 返回,打印结果2 Main->>Main: f3.get() 阻塞,等待任务3完成 Note over Pool: 线程B空闲,从队列取任务5执行 Pool->>Pool: 线程B 执行任务5 Note over Pool: 任务3完成 Pool–>>Main: 任务3完成,唤醒主线程 Main->>Main: f3.get() 返回,打印结果3 Note over Pool: 任务4、5还在执行中… Main->>Main: f4.get() 阻塞,等待任务4完成 Pool–>>Main: 任务4完成 Main->>Main: 打印结果4 Main->>Main: f5.get() 阻塞,等待任务5完成 Pool–>>Main: 任务5完成 Main->>Main: 打印结果5
练习
需求:创建两个线程任务,一个线程任务完成1-100的和,一个线程任务返回一个字符串
public class MyString implements Callable<String> {
    @Override
    public String call() throws Exception {
        return "那一夜,你没有拒绝我,那一夜,你伤害了我";
    }
}
public class MySum implements Callable<Integer> {
    @Override
    public Integer call() throws Exception {
        int sum = 0;
        for (int i = 1; i <= 100; i++) {
            sum+=i;
        }
        return sum;
    }
}
public class Test01 {
    public static void main(String[] args) throws ExecutionException, InterruptedException {
        //创建线程池对象
        ExecutorService es = Executors.newFixedThreadPool(2);
        Future<String> f1 = es.submit(new MyString());
        Future<Integer> f2 = es.submit(new MySum());
        System.out.println(f1.get());
        System.out.println(f2.get());
    }
}
第六章.定时器_Timer
1.概述:定时器
2.构造:
  Timer()
3.方法:
  void schedule(TimerTask task, Date firstTime, long period)
                task:抽象类,是Runnable的实现类
                firstTime:从什么时间开始执行
                period: 每隔多长时间执行一次,设置的是毫秒值
public class Demo01Timer {
    public static void main(String[] args) {
        Timer timer = new Timer();
        timer.schedule(new TimerTask() {
            @Override
            public void run() {
                System.out.println("金莲对涛哥说:涛哥,快起床了~~~");
            }
        },new Date(),2000L);
    }
}
文章摘自:https://www.cnblogs.com/JIANGzihao0222/p/20188430
 京ICP备14020293号-4